
We're sharing this post by Christine Baker from QUILTsocial, a fantastic site where you can find blogs featuring tips and projects about all things quilting!
READY…SET…GO!
We are finally ready to get stitching. When you are thread painting (or doing free motion embroidery – both terms are used) you can either stitch with a zig zag or a straight stitch.
If you can NOT drop your feed dogs and have to use a cover that only has a small needle hole, then you can only use a straight stitch. I’m going to try both to see which one I prefer.
FIRST THINGS FIRST – THE GREENERY
I decided to stitch the leaves and stems first as they seem the easiest things to start with. First of all I’m going to try using a straight stitch. I’ve got my feed dogs down and I’ve pulled my bobbin thread up to the top of the fabric. I hold both of the threads in my left hand (to prevent them from being pulled to the back) and I start stitching!
Please note that since I’m using my left hand to hold my camera, you’ll notice that I’m only using one hand to stitch instead of having two hands framing the needle.
Straight stitch thread painting – YouTube
Christine Baker of Fairfield Road Designs demonstrates how to thread paint using a straight stitch and Tutti™ thread from WonderFil™
ON TO THE ZIG ZAG
I’ve figured out that, like machine quilting, the faster the machine is running, the nicer the stitches look! But unlike machine quilting, you don’t have to worry too much about keeping the stitches consistent! I think doing thread painting would be great for those quilters who are afraid of free motion quilting. You can get the feel of moving the fabric with the thread dogs down, but this is MUCH more forgiving than machine quilting. So now that I am comfortable with the straight stitch I’m going to try out the zig zag – once again, I usually use two hands when stitching!
Zig Zag thread painting – YouTube
Christine Baker of Fairfield Road Designs shows us how to thread paint using a zig-zag stitch and Tutti™ thread from WonderFil™
As you can see in the following picture, the zig zag stitching on this leaf caused the fabric to pucker more that when I used the straight stitch. I’m sure that I was moving the fabric back and forth too quickly, but I also find the stitching to look messy, so I am going to stick with the straight stitch.

Leaf stitched with zig-zag stitch.
USING THE VARIEGATIONS TO YOUR ADVANTAGE
Now that I’m getting the hang of thread painting, I can see now that if I pay attention to the thread changing colour, I can use the lighter sections to highlight the lighter side of the stems and the darker sections of thread to stitch the darker side of the stems. I also find that I prefer to use the thread to outline the shapes and highlight sections instead of covering the whole shape – see what I mean in this photo:

Stems and leaf stitched with straight stitch.
LET’S TRY OUT SOME FLOWER POWER
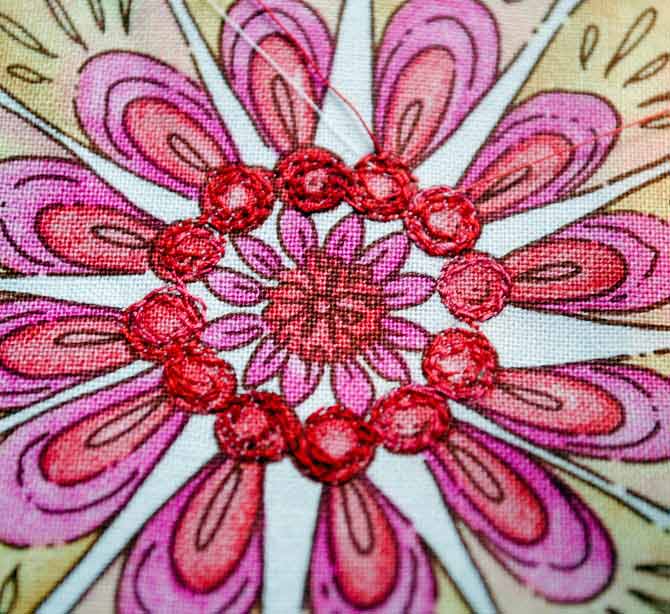
I’ve stitched enough of the leaves and stems (at least for now) so I’m going to switch thread color and start working on the large flower. Here is a close-up of my first stitches made on the flower. As you can see, my thread choice was quite similar to the color of the fabric, so my stitches don’t stand out that much. I think for the rest of the stitching I’m going to try to pick threads that are either lighter or darker, or more heavily variegated so that they are more noticeable in the finished product.
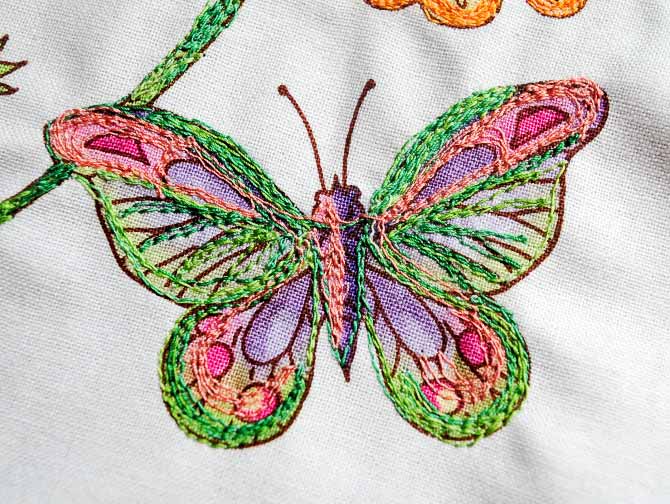
For the butterfly I chose to stitch with the green variegated Tutti™ and the peach coloured Konfetti™ thread. I found that these choices ended up making the stitching much more noticeable.
I’VE GOT LOTS OF STITCHING AHEAD OF ME…
I can see already that this new technique might be dangerous! Not only is it going to eat up lots of my threads but it might eat up lots of my time too!! The more colours you add to the thread painting, the more beautiful it becomes. I love how the design on the fabric is subtly changed and the tactile feeling of the embroidery is added to the fabric.