
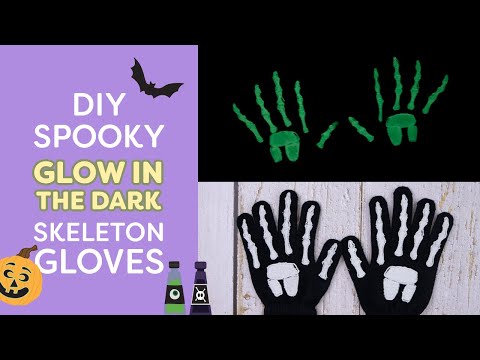
¿Quieres hacer algo que realmente destaque este Halloween? Este sencillo proyecto utiliza bordado a máquina e hilo que brilla en la oscuridad para hacer que un par de guantes comprados en la tienda realmente destaquen en la oscuridad. Este accesorio se puede combinar con cualquier disfraz espeluznante este Halloween para darle un toque extra. ¡Incluso hemos incluido un patrón gratuito para tu máquina de bordar para que puedas hacer este proyecto fácilmente en casa! Puedes descargar el patrón gratuito para tu máquina de bordar aquí: http://bit.ly/2K2sCs2
Si quieres, puedes vernos hacer este accesorio escalofriante mientras haces el tuyo. Después de todo, los amigos no pueden hacer cosas espeluznantes solos. Puedes ver nuestro video de YouTube aquí:
Después de cargar el patrón en tu máquina de bordar, deberás elegir el hilo. Para el hilo superior, utilizaremos este hilo que brilla en la oscuridad llamado Ahrora. Es un hilo de 40wt que viene en 8 colores diferentes, pero usaremos AR02 Cream para nuestras manos de esqueleto. ¿Te gustaría añadir este hilo que brilla en la oscuridad a tu colección? Puedes comprar Ahrora en nuestro sitio web aquí

Puedes usar un hilo de canilla normal con tu diseño, pero para facilitar mucho el paso de aplicación, usaremos este poliéster algodonado de 80wt llamado DecoBob. Al colocar este hilo en la canilla, crearás un encaje ligero y autoportante que será fácil de mover una vez unido al guante.
¿Necesitas hilo de canilla ligero? Puedes comprar canillas precargadas de DecoBob en nuestro sitio web, aquí

Cose el diseño sobre una capa de estabilizador soluble en agua. Asegúrate de elegir la versión suave que se siente un poco como tela. Cose los diseños de la mano izquierda y derecha en un bastidor de 140 mm por 140 mm.

Una vez que el diseño esté terminado de coser, retíralo del bastidor y enjuaga el estabilizador soluble en agua con agua tibia, masajeando suavemente el bordado entre tus dedos para retirarlo por completo. Extiende las piezas para que se sequen. Si crees que olvidarás el orden en que van los huesos de los dedos, ¡no cortes el hilo entre cada hueso para que cuando laves el estabilizador queden en el orden en que deben ir! Una vez que se hayan secado y los hayas sujetado con alfileres, puedes cortar el hilo sobrante cerca del encaje autoportante para limpiarlo.

Una vez que tus piezas de bordado estén secas, colócalas en tus guantes con el hilo Ahrora hacia arriba y el lado DecoBob hacia abajo contra la tela. Podrás notar la diferencia porque el lado DecoBob, o el lado equivocado, tendrá algunos nudos pequeños, mientras que la parte superior se verá nítida y limpia. Presiona en su lugar con una plancha a baja temperatura para eliminar cualquier rizo del encaje autoportante. El calor bajo también te ayudará a evitar derretir la tela del guante. No solo hará que los guantes se vuelvan rígidos y cerosos, ¡sino que también crearás un pequeño desastre en tu plancha y en tu encaje autoportante recién cosido!

A continuación, tendremos que aplicar las piezas para sujetarlas de forma segura. Usaremos este hilo de algodón de 60 wt llamado Efina, ya que el material de algodón ayudará a que se mezcle con los guantes, y el hilo de algodón tiene un diente que ayuda a evitar que se resbale mientras haces tu aplicación.

Efina es un excelente hilo ligero para aplicar, ¡así que por qué no añadirlo a tu colección! Puedes comprar hilos Efina aquí
Anuda el extremo de tu hilo y tira de la aguja por detrás del aplique para ocultar el nudo entre la pieza del aplique y el guante. Con puntadas pequeñas, aplica cada pieza, asegurándote de coser todo alrededor de cada pieza para mantenerla en su lugar. Ten cuidado de no coser accidentalmente demasiado lejos en el guante para no coser la segunda capa de tela, de lo contrario coserás el guante. Ten cuidado de no tirar del hilo con demasiada fuerza, ya que podría crear un poco de rigidez y fruncido alrededor del aplique.

Si quieres aplicar sin el estrés de enganchar accidentalmente la tela inferior, ¡puedes meter un lápiz en los dedos del guante mientras coses! Esto creará una barrera entre la tela superior e inferior y eliminará cualquier posibilidad de enganchar la tela inferior.

Una vez que hayas terminado de aplicar cada pieza, ata el hilo. ¡Ahora puedes sacar tus guantes por la noche o a una habitación oscura para lucir tu nuevo y espeluznante accesorio!
Si quieres obtener un brillo intenso de tus guantes de esqueleto que brillan en la oscuridad, ¡puedes comprar una linterna UV! Ilumina el hilo Ahrora durante solo unos segundos para obtener un brillo intenso. Ten cuidado de no mirar directamente a la linterna cuando esté encendida, ya que esto puede dañar tus ojos.
Puedes encontrar linternas UV aquí: https://amzn.to/3iD4JE7
Si prefieres no usar una linterna UV, ¡también puedes dejar estos guantes al sol por un corto período de tiempo para intensificar su brillo!

Si necesitas ideas de disfraces para combinar con estos, no te preocupes. Hemos buscado en Internet y hemos encontrado el disfraz de Halloween DIY más genial para combinar con estos espeluznantes guantes.
¡La idea más sencilla sería un esqueleto! Si no quieres gastar mucho en un disfraz completo, ¡aquí tienes el DIY perfecto para un disfraz de esqueleto usando una camiseta de manga larga negra y una camiseta blanca! http://thisisladyland.com/make-a-10-minute-skeleton-costume/
También puedes suscribirte a nuestro boletín gratuito para recibir más consejos educativos de costura, tutoriales y patrones gratuitos. ¡Regístrate haciendo clic aquí! ¡Nos vemos la próxima vez!